Step 4 - Surfacing
<< Prev.......... Next >>Wood Required
- 2 Sheets 4'x8' (3/8)" plywood (non-treated)
- 1 Sheet 4'8' (3/4)" plywood (treated)
- (optional) 3 Sheets (1/4)" massonite
Note: This ammount of plywood should cover the ramp, but buying an additionall piece of (3/8)" plywood will allow you to do it in less pieces.
A Note
For this funbox I used one layer of plywood and one layer of massonite. Usually on ramps you use 2 layers of plywood plus nothing/massonite/skatelite. I didn't have any problems going with one layer of plywood, but if you dont add massonite/skatelite you probably want to use two layers of plywood.
Part 1: Transition Surfacing
Use the (3/8)" plywood for this step
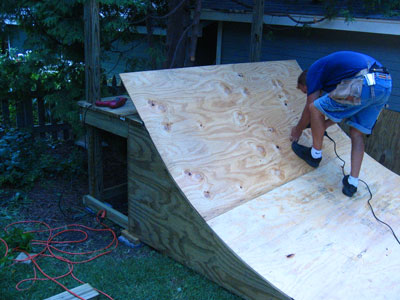
There are many different ways to do this, the important thing is that you cut plywood in a manner that it covers the entire transition. The traditional way of bending plywood is the wide way (example). However, when surfacing the transition I bent the plywood the long way, this way I was able to get the plywood to span from the top to the bottom of the transition (although used multiple pieces side to side), which wouldn't be possible bending plywood the wide way since it is only 4' wide and the transition is longer than that. If you bend the plywood the wide (traditional) way, you will need to use two pieces to reach from the transition bottom to top, and you will have to make sure that the meeting point of the pieces is over a 2x4 (you might want to add an extra 2x4 to have 4" of space to work with).
Conclusion: If you are able to bend the plywood the long way I would recommend it for this ramp, if you are having a hard time bending it the long way do it the wide way but make sure the seams are supported with 2x4s.
So as you can see in the picture below, I put one piece of plywood down and had to cut an extra piece to make up for the fact that the funbox is 5' wide but plywood is only 4' wide. (I actually used two pieces for the 1' wide strip, but that is because I was using scraps)
For the 8" on the top that isn't part of the transition, use 3/4" plywood. Take your time to make sure the transition from this piece and the 3/8" plywood on the transition is flush.
This picture is ahead of the plans at this point, it shows the transition and middle box with plywood and painted massonite.
Part 2: Middle Box Surface
This part is easy, just cut the 3/4 inch plywood to fit over the middle box and screw it in.
Part 3: Massonite / Skatelite
This step is optional, but like I mention above if you dont add a top surface layer you might want to use two layers of plywood.
Surfacing with massonite is pretty much the same as surfacing with plywood, except that massonite is MUCH easier to bend. Just cover the surface with massonite but make sure that the seams dont like up with the plywood.
As you can see I painted the massonite white (it comes in brown), this was mostly because I painted all the ramps in my barn white for better lighting, it also helped my funbox deal with being dripped on. If your funbox gets rained on you will need to either use skatelite or cover it with a tarp, neither massonite nor plywood will withstand the rain and your funbox will warp quickly.
Thats it! Your funbox could be done, or you could add a rail...
