Skate Ramp Building Tips and FAQs
Surfacing
Surfacing can be the most expensive part of the ramp, it is also the first part of the ramp that gets ruined by weather if not protected properly. You should plan ahead when surfacing the ramp, you would not want to let your ramp sit in the rain after putting down only the plywood or unpainted massonite (the massonite expesially will begin to warp the first time it gets rained on). The first two layers of the surface should always be 3/8" untreated plywood. There are three main options for the top surface:
- Skatelite - the best skating surface, they use this in the X games. Its weather resistant, but costs around $150 per sheet. ( link )
- Massonite - this is a tempered hardboard, it comes in 1/8" and 1/4" (use the 1/4") and is only about $10 per sheet. It makes the surface nice and smooth (not my opinion, but too slipery to some). Tempered hardboard is not, however, resistant to the sun and rain, and must be protected.
- Skate the plywood - you can stick with the 2 layers of plywood and skate that. The untreated plywood is not resistant to sun and rain, so you will need to protect it. Keep in mind plywood hurts more to fall on. I recommend massonite over this option because you will likely find yourself replacing the surface at some point, and massonite is much easier to replace (it bends much easier, then ideally you will not need to replace the plywood underneath).
If you use skatelite (note there are other $100+ per sheet skate surfaces out there like ramp armor) you do not need to protect the surface, since skatelite is water and sun resistant. You might want to lay tar paper under the skatelite ( instructions ), to protect the plywood from the water that seeps through the cracks.
If you do not use skatelite (either massonite or no top surface), it is a good idea to use water resistant paint to protect it from sun and rain. Two types of paints that work well for this is Spar Urethane and Polyurethane Paint. In addition to painting the ramp, a giant tarp is also a good idea, the last thing you want is water pooling up on your ramp (painted or not).
- Spar Urethane - Costs about $33 / gallon (which covers ~500 sq ft), this is the most heavy duty paint you can get, and will give your plywood/massonite the best protection. Note you might want to use multiple layers (an 8' wide 3.5' tall mini has about 200 sq ft of surface area).
- Polyurethane Paint - a.k.a. porch paint, costs about $21 / gallon (again 500 sq ft). This is similar to other polyurethane sealers (which also work, but this stuff is cheaper) with an extra benefit of being able to pick and choose a color. This will not protect as well as spar urethane, but it might be the best paint for the price.
My recommendation for surfacing an outdoor ramp is to use two layers of 3/8" untreated plywood, paint the top layer of plywood with polyurethan paint (maybe the underneath side as well), then use a layer of 1/4" massonite for the top surface (smooth side up), painted with spar urethane, and a giant tarp to cover when you are not skating the ramp.
Space
I made an online ramp tool that you can input different height, transition radius, flat bottom length, and platform lenghts and it will give you a preview with the total length, this should help you figure out what you can fit.
I've been getting a lot of emails from people trying to squeeze a halfpipe in a small space. I'll do a length breakdown of the smallest 3 foot halfpipe I can think of. Each of the transitions needs to be about 6 feet long (when using a 6' 10" transition, you could make this length smaller by using a steeper transition). For a 3 foot high pipe, the ideal flatbottom is about 8 feet in length, I can see this being reduced to 4 feet, but only if it is absolutely necessary. Then the smallest platforms I would recommend building is 1 foot, which brings the total length of the pipe to 18 feet (17.88 to be more precise).
As far as width goes, the plans show an 8 foot wide halfpipe, the smallest width worth building is about 4 feet (in my opinion).
Screws
I seem to have left screw details out of most of the plans (sorry). Use 2.5 inch deck screws except for the plywood. For the surface plywood you can use drywall screws around 1.5 inches (these are less expensive), and note that you do not have to put a ton of screws into the bottom layers of plywood, just make sure to put a lot of deck screws on the top surface, which will hold all the layers down.
Bending the Surface Plywood
This is one of the more difficult parts of the ramp building process. First off make sure you bend the plywood the way it is being bent in the picture below
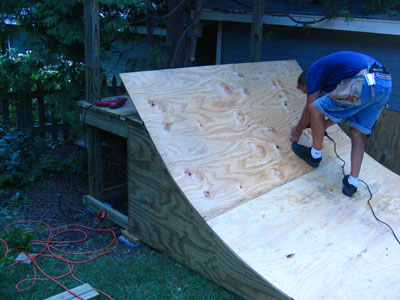
Second make sure you are using 3/8" plywood, anything thicker you will have a very difficult time bending. If you are having difficulties, make sure to take your time, you do not want to mess up the surface by screwing in the plywood in the wrong spot, or breaking it. As in the picture above, it is generally easiest to start from the bottom and work your way up with the plywood.
Get friends to help you, have them slowly put pressure against the plywood with their foot as you screw it in.
Drawing Transitions
This is a very crusial step in building any ramp, make sure to read the Drawing Transitions Section.
Transition Between Ground and Ramp
For a ramp that transitions to the ground, a piece of sheet metal is ideal to make the transition smooth (and to protect the edge of the surface). Unfortunately, you probably wont be able to find good sheet metal at place like Home Depot or Lowes. My suggestion is to first search google or the yellow pages for a local steel fabrication / surplus / distribution shop and see what they have.
If you cannot find what you want there, check out www.speedymetals.com. I would recommend about 13 gauge steel, which is .09 inches thick, then 6" wide will do. You might not be able to find the correct length on the site but they will do custom orders if you email them.
Another solution is to get a 2x6 or 2x8 and cut it at an angle (diagonally down the long way) to place at the bottom of the ramp. I have also heard from visitors that have used street signs and the metal that goes over the carpet under a door.