Steps 1+2: The Quarterpipe Skeletons
<< Prev.......... Next >>I'll admit right now these plans are not the best on this site, I made them in 7th grade and didn't take any pictures while I built the halfpipe, but you should be able to get a pretty good idea on how to build it. I might be adding more quality vert halfpipe plans sometime in the future
- Wood Required (for one bottom piece)
- 2 pieces (3/4) inch plywood
- 9 pieces 8' 2X4.
- Wood Required (for one top piece)
- 2 pieces (3/4) inch plywood
- 6 pieces 8' 2X4.
Part 1: Cut the plywood
The first thing you need to do is cut out the side pieces that are going to support the 2X4's. Since plywood is only 4' by 8', you need to stack one quarterpipe on another, like this...
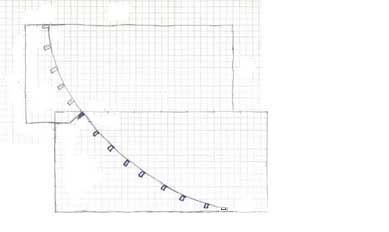
Figure 1
In order to draw the curve, I suggest using the String and Compass method with slightly less than an 8 foot transition, so that there is a little vert, if you don't want vert use an 8 to 9 foot transition.
Because you have to stack two quarterpipes on top of eachother (see figure 1), the string and compass method can get tricky to draw the transition on both pieces, but here is how to make it possible. Take two pieces of 4' by 8' (3/4)" plywood. lay them on the ground next to eachother so that together they make an 8' by 8' square. Stand at the bottom of one of the pieces of plywood so that its long side is laying directly in front of you (lets call it piece 1, the far piece of plywood will be piece 2). Slide that piece of plywood up 3.5" (so that it goes over piece 2). Next Slide piece 1 to the right 18". The two pieces of plywood should now look like this...
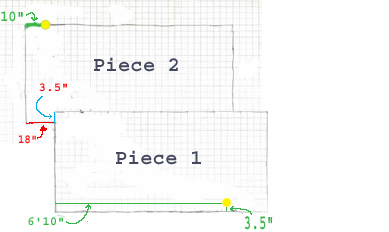
Figure 2
Now you are ready to use the string and compass method, your starting point is the bottom yellow dot shown in figure 2, it is above the bottom 3.5" so that the plywood will go onto the bottom pieces which are 3.5" high (they are made later), your top point will be the yellow dot on top.
Once you have your curve drawn, separate the pieces of plywood and cut along the line u drew using the string and compass of the bottom piece (aka piece 1).
Now take that bottom piece of the curve and make cuts so it looks like figure 3 below, which is pretty much just cutting out that piece in the top left corner. the angle on this piece is not too important, try to make it so that it is comming into the curve perpendicularly as shown.
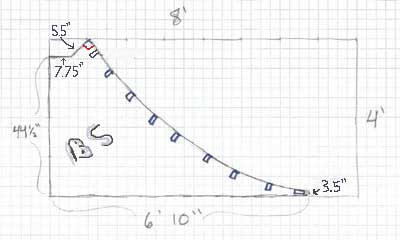
Figure 3
Now that you have your bottom piece all cut out, line up its curve with the curve of the upper piece, then trace along the upper left piece that you cut out in figure 3 and then cut the upper piece so it looks like figure 4 below.
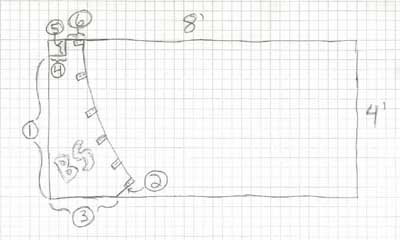
| Key | |
|---|---|
| Number | length |
| 1 | 3' 8" |
| 2 | 5.5" |
| 3 | 1' 10" |
| 4 | 4.5" |
| 5 | 4" |
| 6 | 5.5" |
You can see you also need to cut out the rectangle in the top left corner of figure 4.
Now you have two cuttouts for your top and bottom parts of the quarterpipe, mark each of these pieces as the originals and trace them onto new plywood so that you have 4 copies of each top and bottom.
Part 2: Use 2X4s to connect the quarterpipe walls.
For the Bottom Piece: Take a 2X4 and skrew it into the top of one of your quarterpipe walls (Use 2 screws), where the blue rectangles are in figure 3, then screw it into the same place on the other side. do the same with the 8 other 2X4s down the curve evenly where u see the blue marks in figure 3.
For the Top Piece: Do the same as for the bottom piece except you only need to use 6 2X4s.
Thats it:Your done with the bottom skeleton, now repeat steps 1 and 2 three times so that you have 4 bottom quarterpipe skeletons