Step 3 - Surfacing
- 2 sheets 3/8" plywood
- 2 sheets 1/4" massonite
- Screws used: Drywall 2.5"
Check out the General Ramp Building Tips for more updated information about surfacing a ramp.
Generally for a miniramp two layers of 3/8" plywood are used, for this ramp I went with one plywood layer (mostly due to time constraints), I used a layer of 1/4" massonite, which doesn't add as much support as a plywood layer, but its better than nothing. I would recommend going with two layers of plywood.
Check out the General Ramp Building Tips for more updated information about surfacing a ramp.
Almost always when surfacing a ramp you want to stagger the plywood and surface pieces as much as possible so the seams to not line up between layers, this improves the ramps strength and helps keep the seems small. However, I want to be able to separate this ramp easily into three parts, so I'm sacrificing a little structural integrity for the convenience. There are two seams on this ramp, on each side of the flatbottom (where it meets the transition). All of my layers are going to have an edge there, so that I can separate the ramp into three pieces without removing any of the surface layers. I would only recommend surfacing your ramp this way if being able to separate the ramp easily will be of great benefit to you (see step 6 for a picture of the growing seam).
The plywood can be screwed in horizontally or vertically. I went with vertical (see picture) for this ramp because that way you don't have to worry about the seam between the two sheets of plywood coming together over a 2x4. However, it can be easier to bend the plywood when it is placed horizontal, it is fine to do it this way, just make sure the seam is over a 2x4. Also if plywood is going to be your top surface, I believe laying it vertical will give a faster ride than horizontal, but i'm not 100% sure.

Start by laying a piece of plywood down and line up the bottom side, you want the plywood to end between those two 2x4's you put right next to each other at the bottom of the transition.
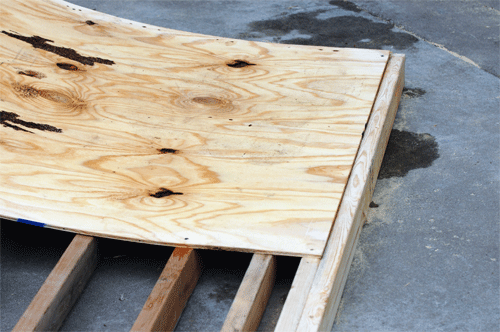
It might be difficult to get the plywood to bend, a trick I used was to get a bucket of warm water, soak a towel in it then use the towel to get the plywood wet. Take your time with this and try to slowly use your body weight to bend the plywood to the transition. It is possible that the plywood will crack (break) as you bend it into place, you will hear cracking noises before this happens so take a step back if you do.
Screw in both pieces of plywood, do not bother to cut the top yet. Screw the two pieces of massonite on top of the plywood, lining up the bottom in the same way. If possible you should try to put the massonite so that the seam does not line up with the layer below it. One way to do this is to lay the massonite horizontal, in fact, I recommend doing this if you are making an 8' wide halfpipe, I didn't need to because my pipe is only 7' wide so I just staggered the layers by a foot.
Keep in mind, you do not need to use as many screws on the plywood layer, since the massonite layer you put on top will be holding both layers in place. Make sure that there are a lot of screws on the massonite, one every foot or so (this is around 50 screws per sheet).
Once both layers are in, you are ready to trim the top. Place your coping back into it's notch to see how much of the surface you need to cut.
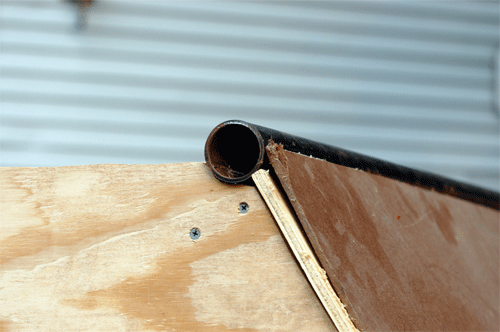
Notice that the 8' surface plywood was just long enough, and I only needed to cut the massonite about 1/4" an inch. I measured it out before hand to make sure that I could get the surface done with two sheets. If you are using measurements different than mine, you might want to keep this mind.